

Hello! I'm guessing that you've already read my review on the Aoshima ACKS model kit of Persona 5's Arsene and want to know how I painted the kit, what's my process and stuff.
Well painting this Arsene kit is mostly easy. The only difficult ones to paint are the small details and how to make the red color pop on the black plastic. If you're an experienced modder or toy painter this should be a cinch. But since I'm not really experienced in toy modding and painting, maybe this will give you, an un-experienced modder/painter like me, some inspiration to tackle this sort of hobby project.

Obviously you need acrylic paints for this project. I recommend Tamiya (the brand I used) or Mr. Hobby brands. You'll also need top coats. When it comes to paint and top coats, I recommend that you use the same brands to avoid incompatibilities.
Tamiya acrylic paints:
- Flat Black (XF-1)
- Flat Red (XF-7)
- Gold Leaf (X-12)
Tamiya top coats (spray):
- Flat Clear or matte (TS-80)
- Clear or gloss (TS-13)
If you're going to use spray paints, be sure you're on a well-ventilated area and have a face mask or anything that will cover your face (especially your nose and mouth) to avoid inhaling the chemicals.
Other items:
- Isopropyl alcohol
- Toothpick
- Paint brushes
- Cotton buds/swabs
- Newspapers (lots of them)
- Lights (lots of them)

I also used a black Gundam Marker (GM-301) for the shadings and detailed (but sloppy) linings.

This common black acrylic spray paint that's mostly found in hardware/home stores, went unused because of incompatibility reasons.
Before painting the parts, I washed the piece while they're on the runners in a kinda warm soapy water. I used an old toothbrush to brush off the residue from the runners. I think those residues come from the factory, I'm guessing lubricant so that they will eject off the moulds easier. After cleaning them, I left them to dry.

Once they're dry, it's time to paint. My method is that I painted the parts/pieces while on their runners. Because I watched a review on Youtube that some parts/pieces of his Arsene kit got broken after disassembling them for painting.
My method is flawed because the paint might get chipped off once I cut the pieces off the runners. Not to mention the obvious extra un-sanded runner bits found everywhere on my Arsene kit.

I first painted the small gold areas of the kit. Applying paint on a small detail is pretty difficult to do for me because of my shaky hands but it went out pretty well in my opinion.

You can see that some parts have excess paint. To correct that, you'll need a toothpick to scrape off those extra paint while it's almost dry.

I used the black Gundam Marker for the linings and shading around the red parts of the kit. I used the thumb-rubbing method to make the shadings (apply the paint, let it dry a bit then use a small amount of isopropyl alcohol and then spread the paint by rubbing them lightly around the surface of the plastic).
If you made some mistakes on applying paint, like using a lot of paint in a small area, just apply isopropyl alcohol on a cotton swab to rub away some of the excess paint.
I really like the look of the hands after I used the Tamiya Flat Black paint on the fingers and adding some shadings around the hands by using the Gundam Marker. After painting the red parts I used the clear top coat around 3 times to coat and seal the applied paint and shadings on these parts.

The red strings/laces on Arsene's hat and underclothing are really difficult to paint. It requires precision like the gold bits and it's hard to paint any color on a black surface (unless they're metallic paint). I will explain how the red pops out without using white paint or primer.

As you can see the red turns pale, pinkish and rough or dry. I tried coating it with more red paint multiple times. I almost gave up until I wiped the sweat from my face and accidentally touching the area that I painted with red paint.

To my surprise the red color pops out the way I wanted, it turned to the kind of red that I like. I waited if the sweat from my face did the trick. Well it almost succeeded. This time, the red faded a bit (it didn't turn pinkish).
So my next attempt is to use my facial oil (yes it's kinda gross) because my face is not sweaty anymore.

Again, to my surprise, my face oil retained the red color for a long duration. So I quickly picked up my clear top coat to spray the pieces that have red paint applications to hold those oily gloss and color then sprayed them with matte top coat for texture. And success! My method is really weird but it did the trick really well, at least for this kit.
I didn't apply any paint or shadings on the wings. I just used the matte top coat.

Now that I painted and top coated the parts, now it's time to read the manual and put them together.

...And it's done! The result is pretty good in my opinion. It makes me happy because this is the first time I painted a model kit and the kit looks better now. I spent a whole day doing this project, the effort was worth it.
Aoshima ACKS Persona 5 Arsene model kit (painted) review
Cheers!
Tamiya acrylic paints:
- Flat Black (XF-1)
- Flat Red (XF-7)
- Gold Leaf (X-12)
Tamiya top coats (spray):
- Flat Clear or matte (TS-80)
- Clear or gloss (TS-13)
If you're going to use spray paints, be sure you're on a well-ventilated area and have a face mask or anything that will cover your face (especially your nose and mouth) to avoid inhaling the chemicals.
Other items:
- Isopropyl alcohol
- Toothpick
- Paint brushes
- Cotton buds/swabs
- Newspapers (lots of them)
- Lights (lots of them)

I also used a black Gundam Marker (GM-301) for the shadings and detailed (but sloppy) linings.

This common black acrylic spray paint that's mostly found in hardware/home stores, went unused because of incompatibility reasons.
Before painting the parts, I washed the piece while they're on the runners in a kinda warm soapy water. I used an old toothbrush to brush off the residue from the runners. I think those residues come from the factory, I'm guessing lubricant so that they will eject off the moulds easier. After cleaning them, I left them to dry.

Once they're dry, it's time to paint. My method is that I painted the parts/pieces while on their runners. Because I watched a review on Youtube that some parts/pieces of his Arsene kit got broken after disassembling them for painting.
My method is flawed because the paint might get chipped off once I cut the pieces off the runners. Not to mention the obvious extra un-sanded runner bits found everywhere on my Arsene kit.

I first painted the small gold areas of the kit. Applying paint on a small detail is pretty difficult to do for me because of my shaky hands but it went out pretty well in my opinion.

You can see that some parts have excess paint. To correct that, you'll need a toothpick to scrape off those extra paint while it's almost dry.

I used the black Gundam Marker for the linings and shading around the red parts of the kit. I used the thumb-rubbing method to make the shadings (apply the paint, let it dry a bit then use a small amount of isopropyl alcohol and then spread the paint by rubbing them lightly around the surface of the plastic).
If you made some mistakes on applying paint, like using a lot of paint in a small area, just apply isopropyl alcohol on a cotton swab to rub away some of the excess paint.

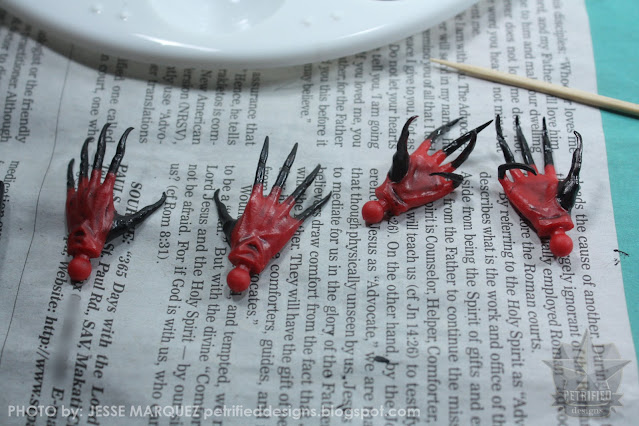
I really like the look of the hands after I used the Tamiya Flat Black paint on the fingers and adding some shadings around the hands by using the Gundam Marker. After painting the red parts I used the clear top coat around 3 times to coat and seal the applied paint and shadings on these parts.

The red strings/laces on Arsene's hat and underclothing are really difficult to paint. It requires precision like the gold bits and it's hard to paint any color on a black surface (unless they're metallic paint). I will explain how the red pops out without using white paint or primer.

As you can see the red turns pale, pinkish and rough or dry. I tried coating it with more red paint multiple times. I almost gave up until I wiped the sweat from my face and accidentally touching the area that I painted with red paint.

To my surprise the red color pops out the way I wanted, it turned to the kind of red that I like. I waited if the sweat from my face did the trick. Well it almost succeeded. This time, the red faded a bit (it didn't turn pinkish).
So my next attempt is to use my facial oil (yes it's kinda gross) because my face is not sweaty anymore.

Again, to my surprise, my face oil retained the red color for a long duration. So I quickly picked up my clear top coat to spray the pieces that have red paint applications to hold those oily gloss and color then sprayed them with matte top coat for texture. And success! My method is really weird but it did the trick really well, at least for this kit.
I didn't apply any paint or shadings on the wings. I just used the matte top coat.

Now that I painted and top coated the parts, now it's time to read the manual and put them together.

...And it's done! The result is pretty good in my opinion. It makes me happy because this is the first time I painted a model kit and the kit looks better now. I spent a whole day doing this project, the effort was worth it.
Aoshima ACKS Persona 5 Arsene model kit (painted) review
Cheers!
No comments:
Post a Comment